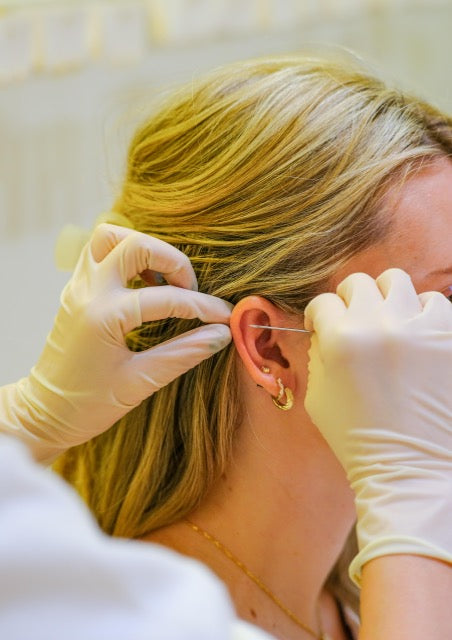
Think ear piercings are just about fashion? Think again. Your ears are the most underrated canvas for self-expression, and can be a proper art form if you know how to use them. Whether you’re a piercing newbie or a curated-ear enthusiast, this isn’t just about jewelry, it’s about owning your personal style with confidence (and avoiding negative experiences/infections!).
At LABRET, we're not just known for ear piercing, we craft experiences. Safe, stylish, and stress-free, you’ll wonder why you didn’t do this sooner.
Types of Ear Piercings: More Than Just Lobes
In a world where we use clothes, jewelry, and hair as avenues to express our styles, the styling of ears has been overlooked for too long. Your ear is a blank canvas, and where you place your piercings can elevate your whole look. Whether it's the classic single central lobe piercing or multiple piercings across the various parts of the ear, there are infinite ways to express your individuality through your ear stack.
Here are our most popular piercing locations:
- Lobe Piercing: The classic. Quick to heal, great for first-timers and children!
- Helix Piercing: The helix is the folded part of the outer ear cartilage. Many ear stack styles now incorporate different parts of the helix to frame the outermost portion of the ear (forward helix, upper helix, mid helix).
- Conch Piercing: Inner "shell" of the ear. Bold and eye-catching.
- Tragus Piercing: That little nub in front of your ear canal, perfect for a small sparkle.
- Rook/Faux Rook Piercing: The ridge inside your upper ear can be pierced through the ridge itself, which is slightly more complex, or from the back of the ear (faux rook) that gives a similar look without the piercing complexity or need for specialized jewelry.
Not sure what suits you? Our piercers at LABRET can help you choose!

Needle vs. Gun: Pros Only Use Needles
Piercing Needles: The Gold Standard
- Sharper and cleaner: A single-use needle punctures the skin smoothly. This causes less trauma and makes for quicker recovery.
- Professional precision: Our expert team is knowledgeable about ear anatomy and the best techniques for each piercing location, which will ensure that the placement of the piercing is precisely where you want it.
- Sterile and single-use: Our piercers only use single-use and sterilized materials so that our clients are set up for the best piercing outcomes.
Piercing Guns: The Big Problem That No One Knows About!
- Blunt force trauma: Smashes through tissue using the jewelry itself, instead of puncturing with a specifically sharp tool.
- Impossible to sterilize: Piercing guns are never single use. They're typically made of plastic, with inserts that get changed out between piercings. Unfortunately, plastic cannot be sterilized, as this would require exposure to high heat which would melt the gun itself. Even the metal guns cannot be properly sterilized between use given their construction, so they're merely wiped down with alcohol swabs (this is not sterile!).
- Higher risk of complications: Crooked piercings, longer healing, more scarring, and a higher likelihood of infection.
At LABRET, we only use needles, because safety isn’t optional. (read: Piercing Guns vs Needles: Why Needle Piercing is the Only Choice)
What to Expect During Your Piercing Appointment
Step 1: Consultation & Marking
- We’ll chat about placement and the best jewelry for the location you would like to get pierced.
- Check the ear using a small flashlight to ensure that there are no veins or blood vessels in the piercing location.
- Using a small sterilized marker, we mark the piercing location. You approve the spot before anything happens.
Step 2: Tools
- Tool preparation occurs well before you walk into the studio. The vast majority of our tools are single-use and sterilized. You can see that everything is individually packaged when you get to the studio.
- Anything that is not single use, in particular the metal clamps we sometimes use to hold the ear at a specific angle when piercing, are sterilized after every use in an industrial grade autoclave machine by our team (this autoclave machine is the same machine your dentist uses to sterilize their instruments!).
Step 3: The Piercing Itself
- This is the easiest part! If you're nervous, we have stress balls and candy to ease the nerves.
- Deep breath in, quick pinch, done. It’s faster and less painful than you think.
- All piercings are done with a longer post (metal piece that sits in your ear) to ensure that your ear has room to swell and recover properly after the piercing. In 4-6 weeks, once the piercing has calmed down, you should come in to downsize the post (jewelry will fit more snugly to your ear and get caught on fewer things, thus be better for healing).
Step 4: Aftercare Briefing
- Our piercer will show you your new piercing in the mirror (yay!) and then explain the best practices for a smooth recovery.
- Every piercing appointment includes a complimentary NeilMed Aftercare Spray, an aftercare guide, and a reminder of when to come back for downsizing.
Step 5: Patience!
- Every person and every piercing will have different recovery periods, so the most important thing to remember is to have patience!
- Swelling, redness, discharge, and other reactions are all very common, so don't stress! Keep the location clean, don't touch your new piercing, and give it time. If you have any concerns or questions, pop into the studio for a free checkup with our piercing team.
- You will receive a reminder for your downsizing date when you check out. This is important:
- Lobes: 6–8 weeks
- Cartilage (helix, tragus, etc.): 3–6 months (sometimes longer)
- Healing isn’t a race. Have patience and be sure to care after your piercing. If anything comes up, come back to LABRET and our team will take a look!
If you know what you want, the entire piercing process at LABRET can be completed in the time it takes to finish a cup of coffee (~15min).
Aftercare 101: Keep It Clean, Keep It Happy
Do’s:
- Wash your hands before touching your piercing.
- Clean 2 times daily with sterile saline spray (NeilMed Aftercare spray included in each piercing appointment).
- Try to avoid sleeping on your piercing, and make sure you have a clean pillowcase.
- You can also purchase a Piercing Pillow with a centralized hole for your ear to rest, which can help take pressure off your piercing (a travel pillow could work as well).
Don’ts:
- Don’t twist or play with the jewelry.
- Don’t use alcohol or hydrogen peroxide (too harsh!).
- Don’t swim in pools/ocean for at least 2 weeks.
- Don't take the piercing jewelry out until instructed that you're good to go by your piercer.
We include a NeilMed Aftercare Spray along with an aftercare guide with every piercing appointment—because we want you to heal perfectly.
Ready to Get Pierced?
At LABRET, we make piercings easy, safe, and stylish. No guns. No guesswork. Just expert piercers who care about you, and want the best for your piercing journey. If you get pierced with us, you're forever a part of our family, which is why we offer free checkups for life.
Book your appointment today, let’s create something extraordinary together.
Got questions? DM us on Instagram @labret.co, we’re happy to help!